Pets Leave Pawprints On Our Hearts

Those of us who have or had pets know they are more than that, they are members of our family.  And when it is time to let them go it tears out our hearts.  I know because I lost my beloved furry companion over 12 years ago and it still grabs my heart when I think about her.  One of our neighbors just lost their beloved dog and I knew they were hurting, so I wanted to make something to let them know I understood their pain.  I wanted it to be clean and simple so that the sentiments were the most important.


pet-sympathy-1(c) Nancy Roth

Since Jake was a boy I decided to use an ivory and navy blue color theme.  I also used a speckled ivory cardstock for the front to add a bit of texture.  I have a dog sympathy stamp set from Our Daily Bread Designs that has some great images and sentiments.  I stamped the main image in the top left and the “with sympathy” below it.  I added a bit of color with Copics to the grass and flowers.  I then added a bit more texture using my scoring board above and below the sentiment and some navy blue sheer ribbon to finish it off.  I stamped one of the other sentiments on the envelope and another inside.

pet-sympathy-2

(c) Nancy Roth

I was very happy with the simple design and my neighbor really appreciated the card and the thought.  You never know when you will be able to cheer someone up a bit with one of your creations.  Doesn’t have to be fancy, as you can see, but it’s a piece of you that they can keep and know you care no matter the situation.

It’s Five O’Clock Somewhere……….

Did you ever stand in a wine store scratching your head and trying to remember what that great bottle of wine was that you had not too long ago?  At my age I have trouble remembering a lot of things!  Around the holidays gifts of wine from friends and guests are new opportunities to try something different.  Some are OK, some not so much, but there is always a bottle or two that you know will become one of your favorites.  So you write it down on a little piece of paper (and then promptly lose it), spend hours trying to soak off the label (and then promptly lose that), or for a last resort you keep the bottle.  I don’t know about you, but I don’t have that kind of space in my new downsized retirement home.  Except for the one blue bottle, one green bottle and one red bottle that are part of our outdoor copper sculpture, all empty wine bottles go into the recycling bin.  And then, of course, when you want to buy that tasty wine again you can’t remember the name or even the color of the bottle.  So I came up with a way to keep track of all those great wines!  Using some matboard and my Bind-It-All I designed a great journal to not only keep track of those wines, but also where to find them and information about the wine itself.  It may be more info than you care to have, but the inside can be adapted to whatever you need.  You can even tape those labels right in the book!


winejournalwire1(c) Nancy Roth

First the 5″ x 8″ covers were made from a white matboard that I found at ClearBags.  It is a nice heavy weight but yet punches with the Bind-It-All.  I found a Mediterranean style printed paper (use lightweight paper and not cardstock so it folds around the matboard better) and covered the matboard using Xyron adhesive.  I then lined the inside of the covers with a merlot colored cardstock to finish them off.  I decided that the outside needed some protection, so I cut sheets of transparencies the same size as the matboards.  On the front one I stamped a wine background stamp from Just For Fun stamps twice to cover the transparency using StazOn black ink.  The back transparency was left plain.

   winejournalwire3
winejournalwire2

(c) Nancy Roth

The inside pages were stamped and printed on white Astroparche text weight paper which gives them a bit of an antique feel.  The front page was hand stamped with stamps, again, from Just For Fun stamps and the inside pages were set up in MS Word and then trimmed down to size.  There are 50 pages back and front for the wine information.  Once I punched and bound all of the pages using the Bind-It-All, I finished off the front cover with a “wine” colored grosgrain ribbon and a brass grape pod charm.

Experiment with some things you have and see what you can come up with.  You can even use ribbons or loose leaf rings to put your books together.  And the next time you are looking for a great gift for a friend or hostess, add your creation to the bottle of wine and they are sure to remember the times you have shared over a newfound taste.  By the way, the idea for this great project came from our wonderful daughter who loves trying new wines, but wanted a way to keep track of them.

Save

It’s Snowing………..Time to Dream of Flowers!!

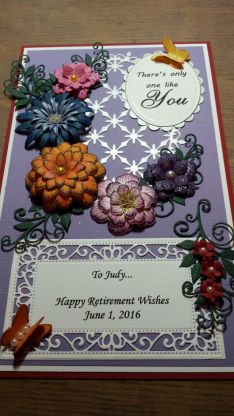
As many others on the USA east coast yesterday, we in Delaware woke up to the start of our first snowfall of the winter….about 6.5″ here in the central part of the state.  We used to live in western Pennsylvania but moved to South Carolina for 7 years, so coming back to winter again was a shock, but it’s still not as bad as in PA!  So how do I cope?  I have a cup of tea and dream of the flowers that I am going to plant this spring!  And thinking of flowers made me think about a project that I was commissioned to do for a retirement gift.  It was one of those projects that started out to be a card but kept growing and growing and ended up being………well, you’ll see!

The honoree, I was told, was a lover of flowers & butterflies so I planned to put some 3D flowers on the card.  I played around with some Heartfelt Creations dies and came up with a bunch of flowers and arranged them on a fancy lattice oval, also from Heartfelt Creations.  I used Copic markers to color pearls for the centers of 3 of the flowers and glued on some gold microbeads for the other 2.  Pearls are used for the bodies of the butterflies.  I added layered Spellbinders ovals with a printed “There’s only one like You”.  Then……the project started growing when they decided they wanted a shadow box, plus some personalization.  So using dies from Sue Wilson (Creative Expressions), including some leaves and the Swiss background die, I came up with this centerpiece that measures 6″x10″ and thought it would work in an 8″x12″ shadowbox frame.  Added a few extra flowers and another butterfly and I sent it off for approval.

retirement-shadowbox3                                                                                (c) Nancy Roth

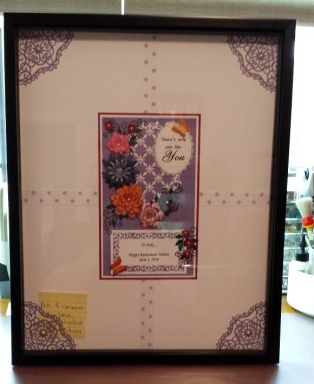
Then they decided that they would like something bigger……something that could be signed by all the co-workers at the company.  So back to the drawing board!  Still using the same centerpiece, I decided to go with a 16″x20″ shadowbox frame thus adding 5″ to each side for signatures.

retirement-shadowbox                                                                               (c) Nancy Roth

In order to cover the backing board I had to use 4 sheets of 8.5″x11″ white cardstock and then used a ribbon to cover where the edges came together.  I had a purple dot wide grosgrain ribbon that matched the main center mat and used that.  Then I decided that it was too plain in the corners and used my Heartfelt Creations Blossom Corner die to cut 4 matching purple corners and accented them with pearls.  I decided to only attach them at the outer edges so that a note or picture could be tucked behind them. (That’s what the yellow note to the buyer is about.)  Anyway, here is the final project!  I was very pleased with it and think the buyer was, as well.  Hope you like it, too, and consider creating some flowers to brighten up your gloomy winter days.

Stay warm!

Save

Save

Save

Save

Happy New Year……And stay well!

Happy New Year to all my blog friends!

Here it is a new year and we are all deciding on how to improve ourselves.  I think that I’m going to try and send more handmade cards, not just to close friends but also to casual friends and neighbors.  I know I would love to receive a handmade card from someone thinking about me.

My hubby and I were at a New Year’s Eve party last night and heard so many stories about people being sick, so I decided to share one of my favorite get well cards that I have made.  I call it my “Downton Abbey” card because it has lace, pearls, tea cup, and of course…tea.

get-well-tea-cup                                                                                 (c)  Nancy Roth

I started with an ivory A7 card base and then layered a pale pink cardstock layer and then an antique pink and beige floral printed patterned paper. The lace die is the Decorative Blossom Corners from Heartfelt Creations cut from the same light pink cardstock and then antiqued with Distress Ink.  The tea cup stamps and dies are also from Heartfelt Creations and colored with Zig markers.  Tag is a punch with 2 pieces glued back to back with the cord between hung from the inside of the cup.  The hardest part was attaching the cup only along the edges.  I tried several different adhesives, tapes and glue until I finally was successful using Alene’s Tacky Glue.  Added some pearls and tucked in a tea bag.  Voila!  A cute get well card bound to make someone smile and think about you when they have that hot cup of tea.

Hope everyone stays healthy and have a wonderful Happy New Year!


Save

Save

Save

Save

Save